
Set up items
An item is anything your shop makes or buys: a finished product, a subassembly, a sheet of steel, a box of screws. Each made item has a routing (the stations it goes through) and can have a bill of materials (what goes into it). Work orders are always for an item.
Admins and managers manage items under Stock → Items. Every plan can name items, give them a routing, and sort them into categories. Inventory (made or purchased, stock on hand, reorder points, bills of materials, and vendors) is on Basic and up.
Find items on the Items list
Section titled “Find items on the Items list”Stock → Items lists every active item: its name, SKU, category, description, and either its routing (“Saw → Weld → Deburr”) or where it’s bought (“Purchased from Coastal Steel Supply”). Tracked items show how many are on hand, and a Low badge (“Low: order 30 sheet” or “Low: make 30”) once stock is at or below its min.
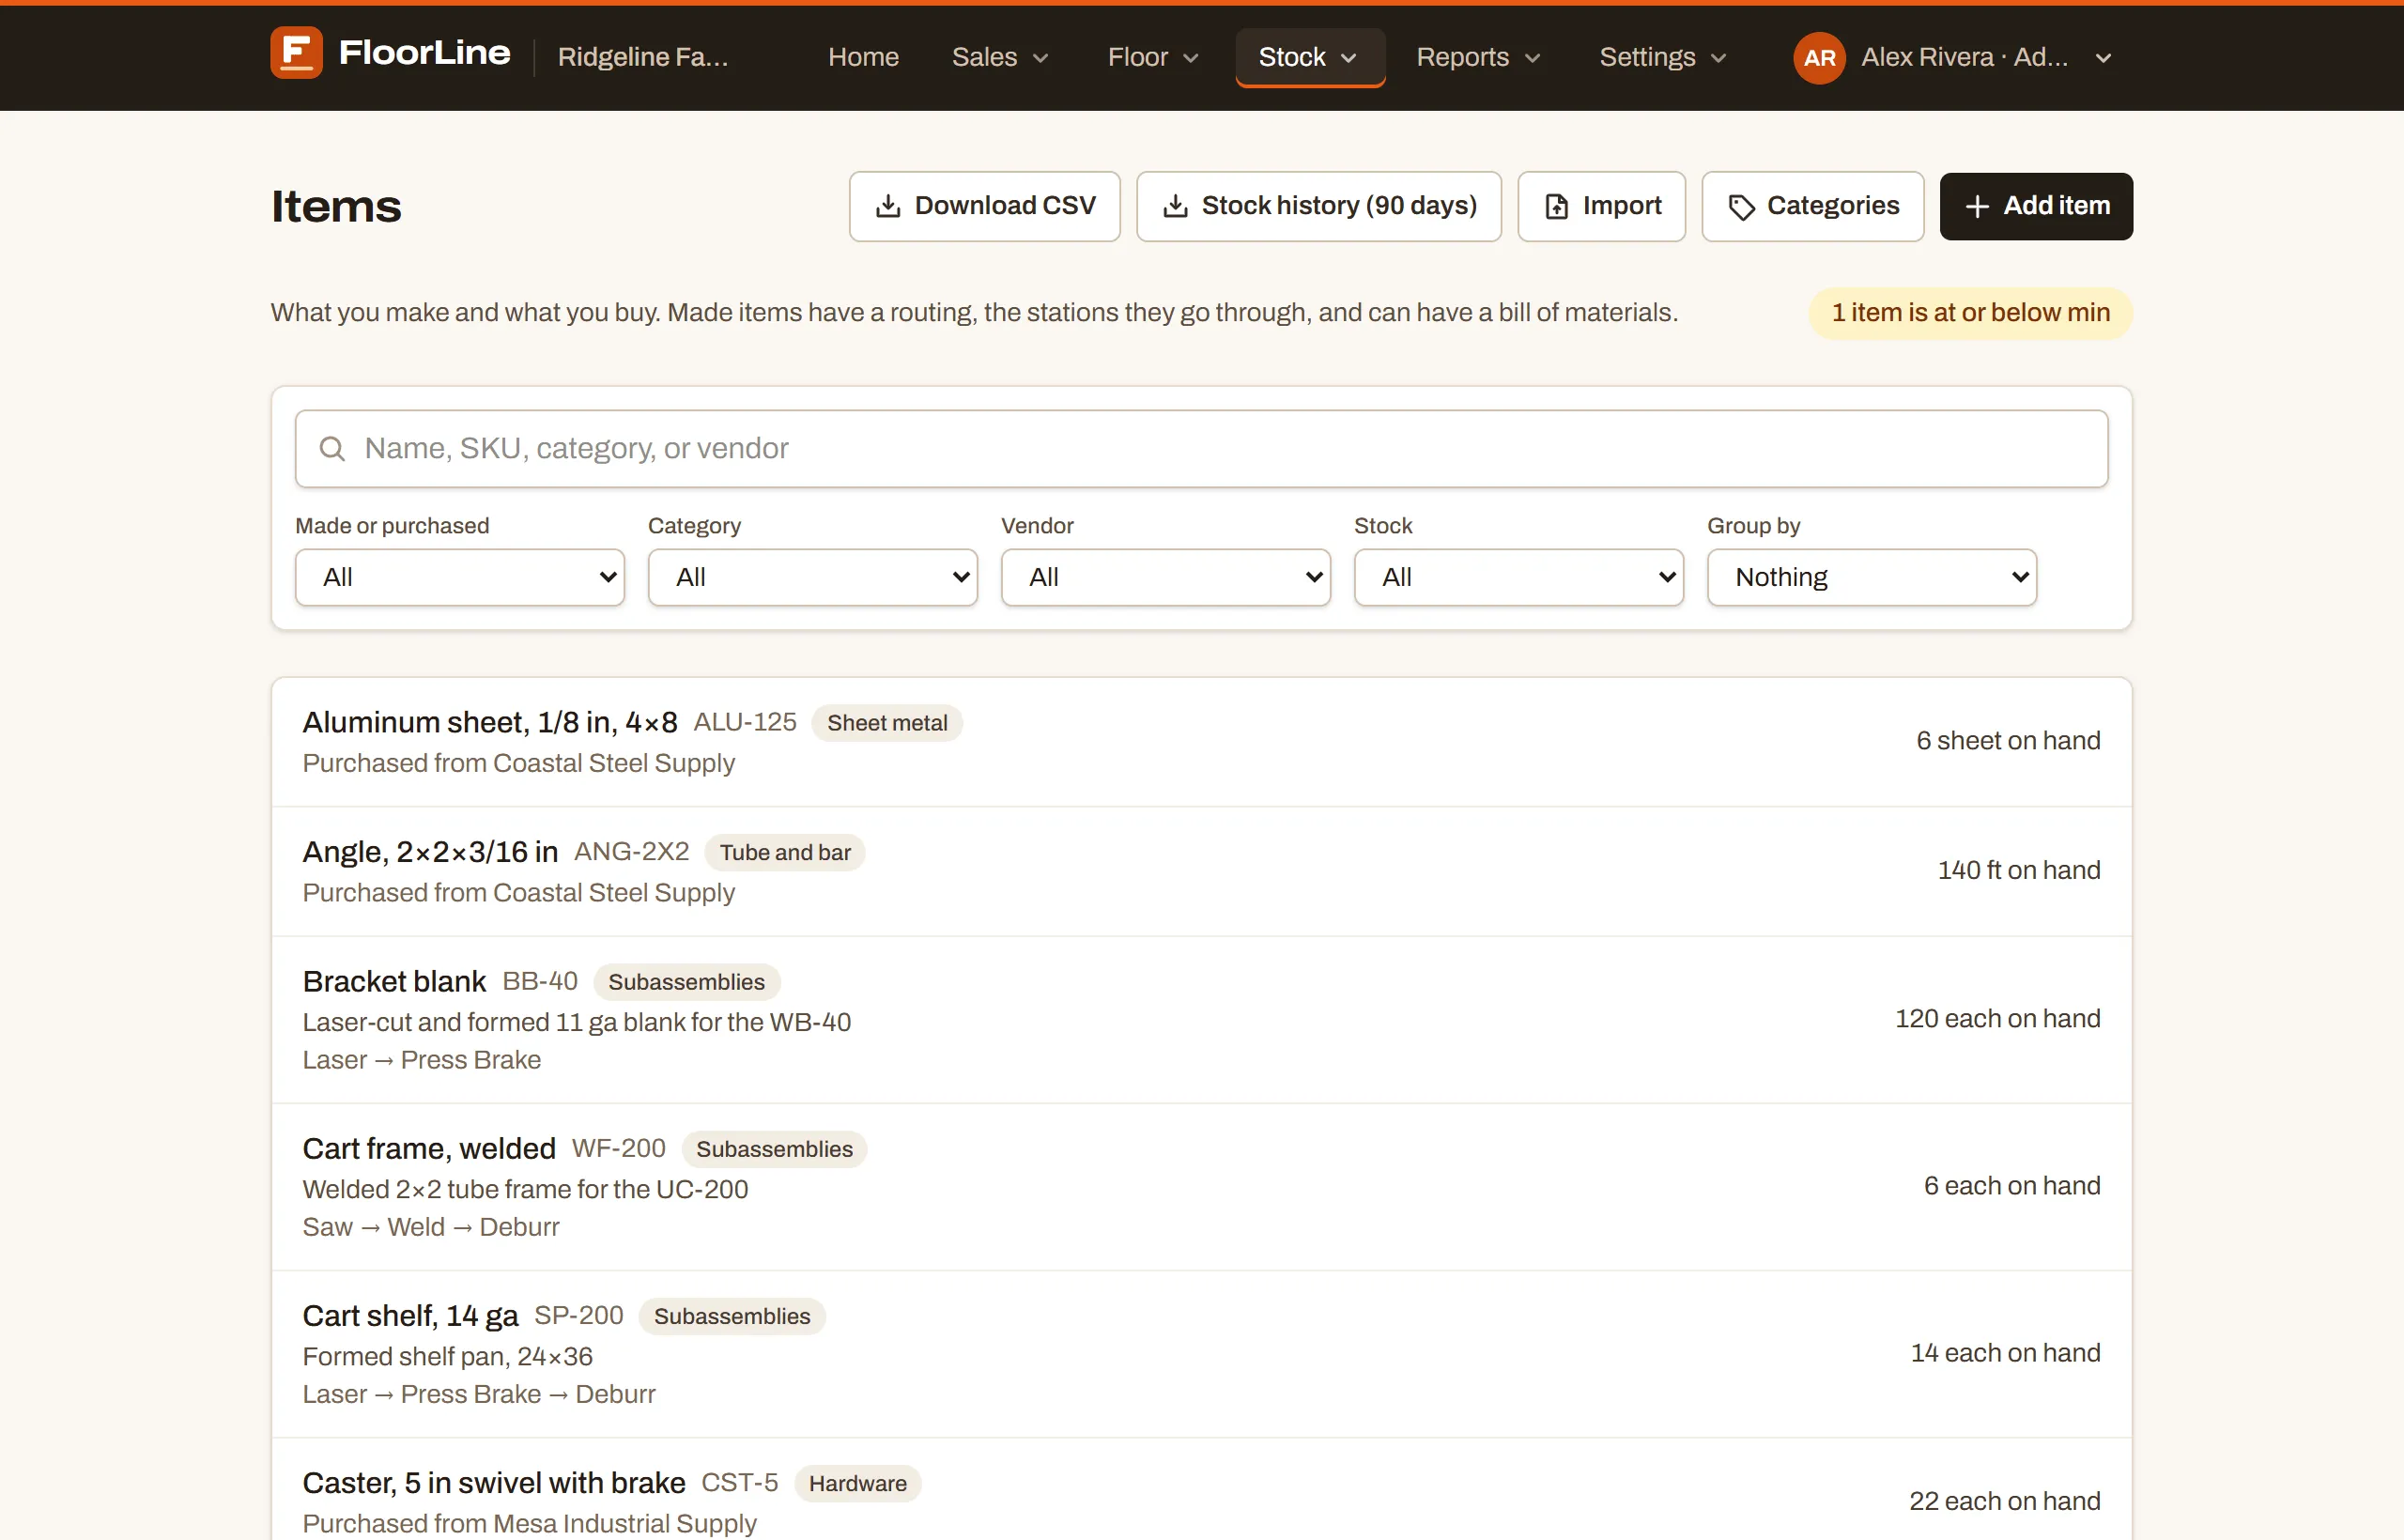
- Search finds items that have every word you type, across the name, SKU, description, category, vendor, and the vendor’s part number.
- Made or purchased, Category, Vendor (any of an item’s vendors, or No vendor), and Stock (At or below min) narrow the list. Clear filters shows everything again.
- Group by splits the list into sections: Category, Made or purchased, Preferred vendor, or Stock (at or below min, stocked, not tracked).
- When some items are low, a pill such as “3 items are at or below min” appears at the top. Click it to show only those.
Your search, filters, and grouping are kept in the page address, so you can bookmark a view or send it to someone. Below Basic, only search and the category filter apply.
The buttons at the top:
- Download CSV downloads the active items as a spreadsheet. Stock history (90 days) (Basic and up) downloads every stock change from the last 90 days. See Export to CSV.
- Import opens Settings → Import from spreadsheets for bringing in many items at once (Mid and up). See Import from spreadsheets.
- Categories opens the Categories dialog.
- Add item starts a new item.
Archived items are listed under Archived items at the bottom of the page.
Sort items into categories
Section titled “Sort items into categories”Categories are your own groups, like Hardware, Raw material, or Finished goods. Each item can be in one category. They’re on every plan.
-
On the Items list, click Categories.
-
Type a name under New category and click Add.
-
To change one, click Rename next to it, type the new name, and click Save. To remove one, click Delete, then confirm.
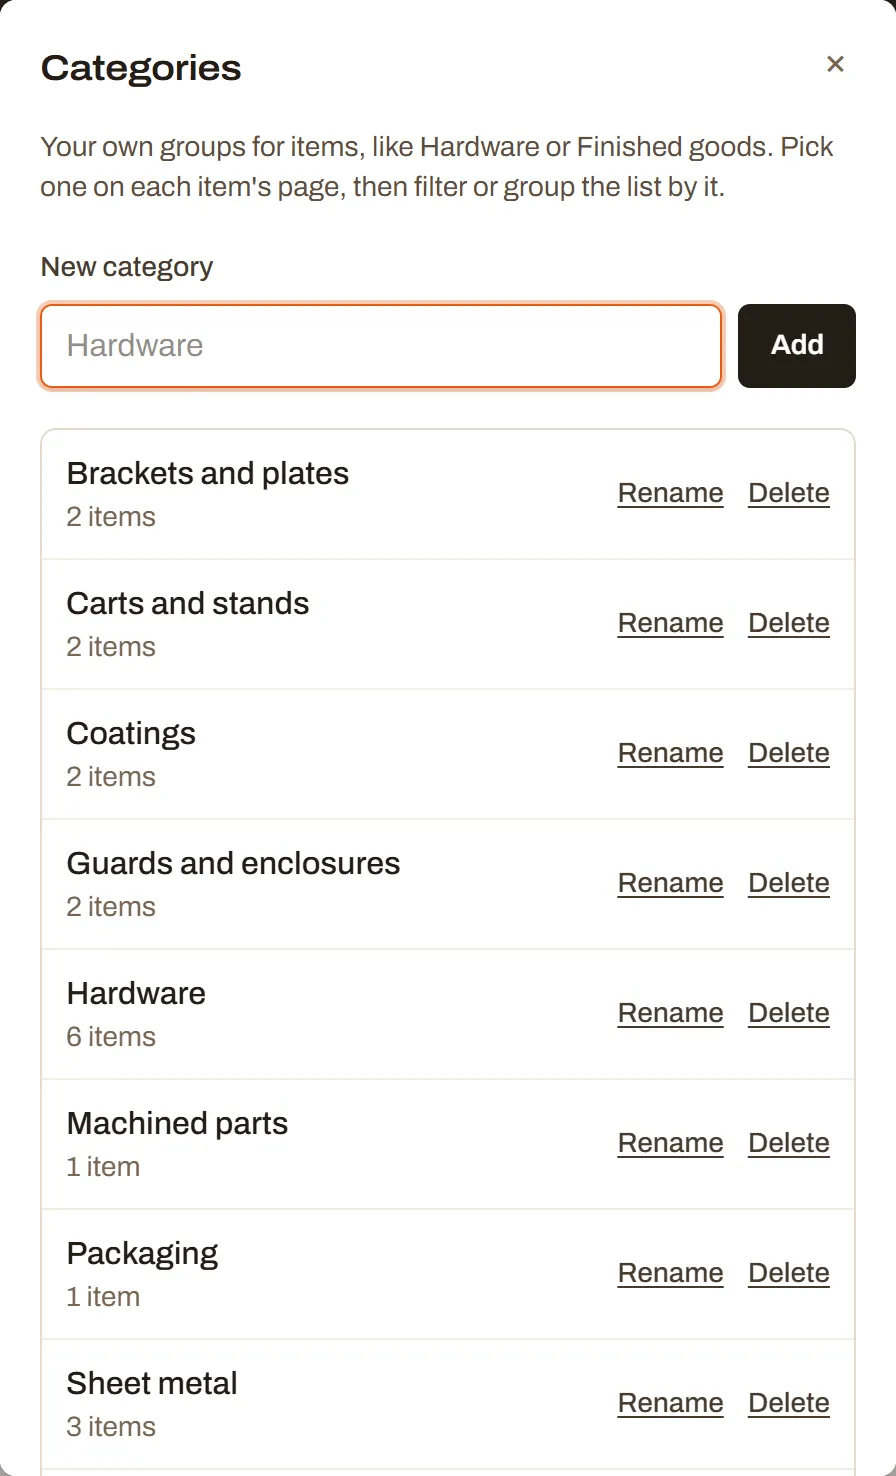
Deleting a category takes it off its items; they keep everything else. A shop can have up to 100 categories, and names must be different from each other.
You can also add a category while editing an item: open the category menu under the item’s name and choose New category….
Add an item
Section titled “Add an item”-
Go to Stock → Items and click Add item.
-
Type the item’s name at the top of the page, where it says Item name. A name is the only thing you need.
-
Fill in anything else you know now: a description, a category, the inventory details, the routing, and the bill of materials. Everything is on one page.
-
Click Save in the bar at the top. FloorLine creates the item and moves you to its page.
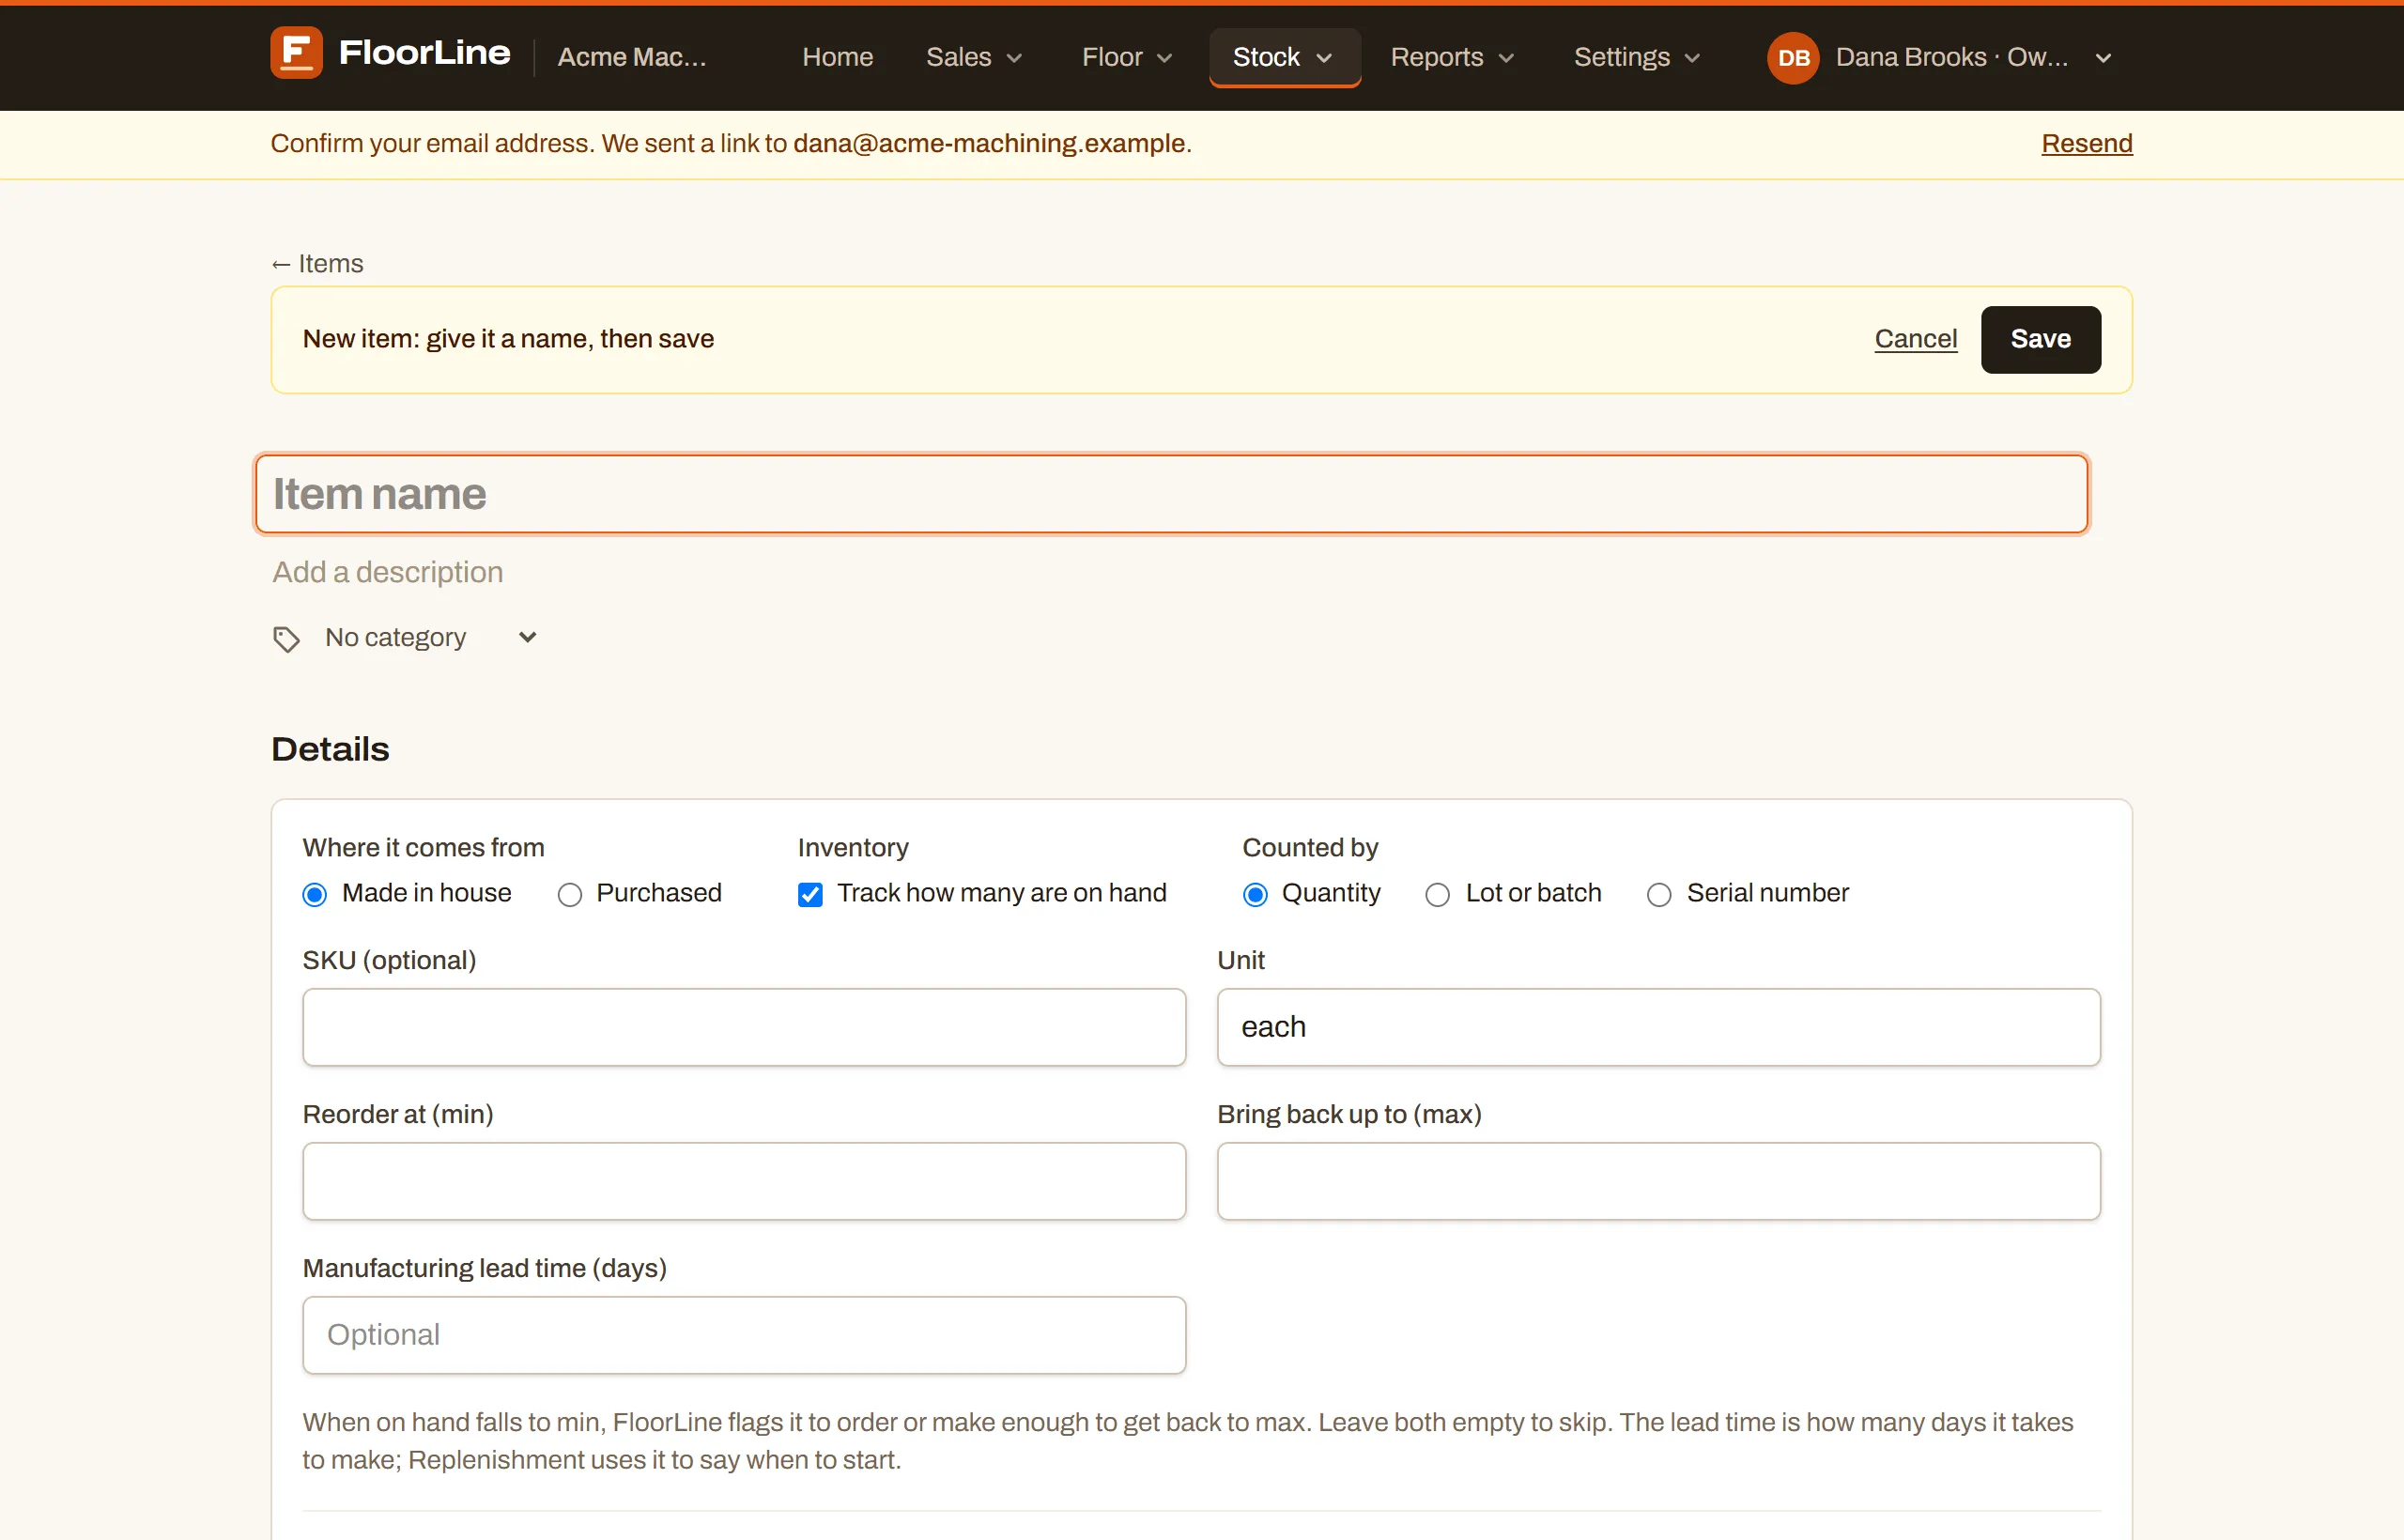
Cancel in the bar leaves without creating anything. A new item starts as made in house, counted in each, with stock tracked.
Change an item
Section titled “Change an item”The item page edits the whole item in place. As soon as you change something, a bar appears at the top saying You have unsaved changes, with Undo and Save. Nothing is saved until you click Save, and then everything on the page (name, details, vendors, routing, and bill of materials) is saved together.
- Undo puts the page back the way it was saved.
- The bar stays at the top of the screen as you scroll, so you can save from anywhere on the page.
- If you try to leave the page with unsaved changes, your browser asks first.
- If something needs fixing, the page says what above the item, for example “Routing line 2 needs a station.” or “Another active item already has that SKU.”
Stock is the one exception: counting or adjusting stock is saved right away from the on-hand dialog (see On hand and stock changes).
Name, description, and category
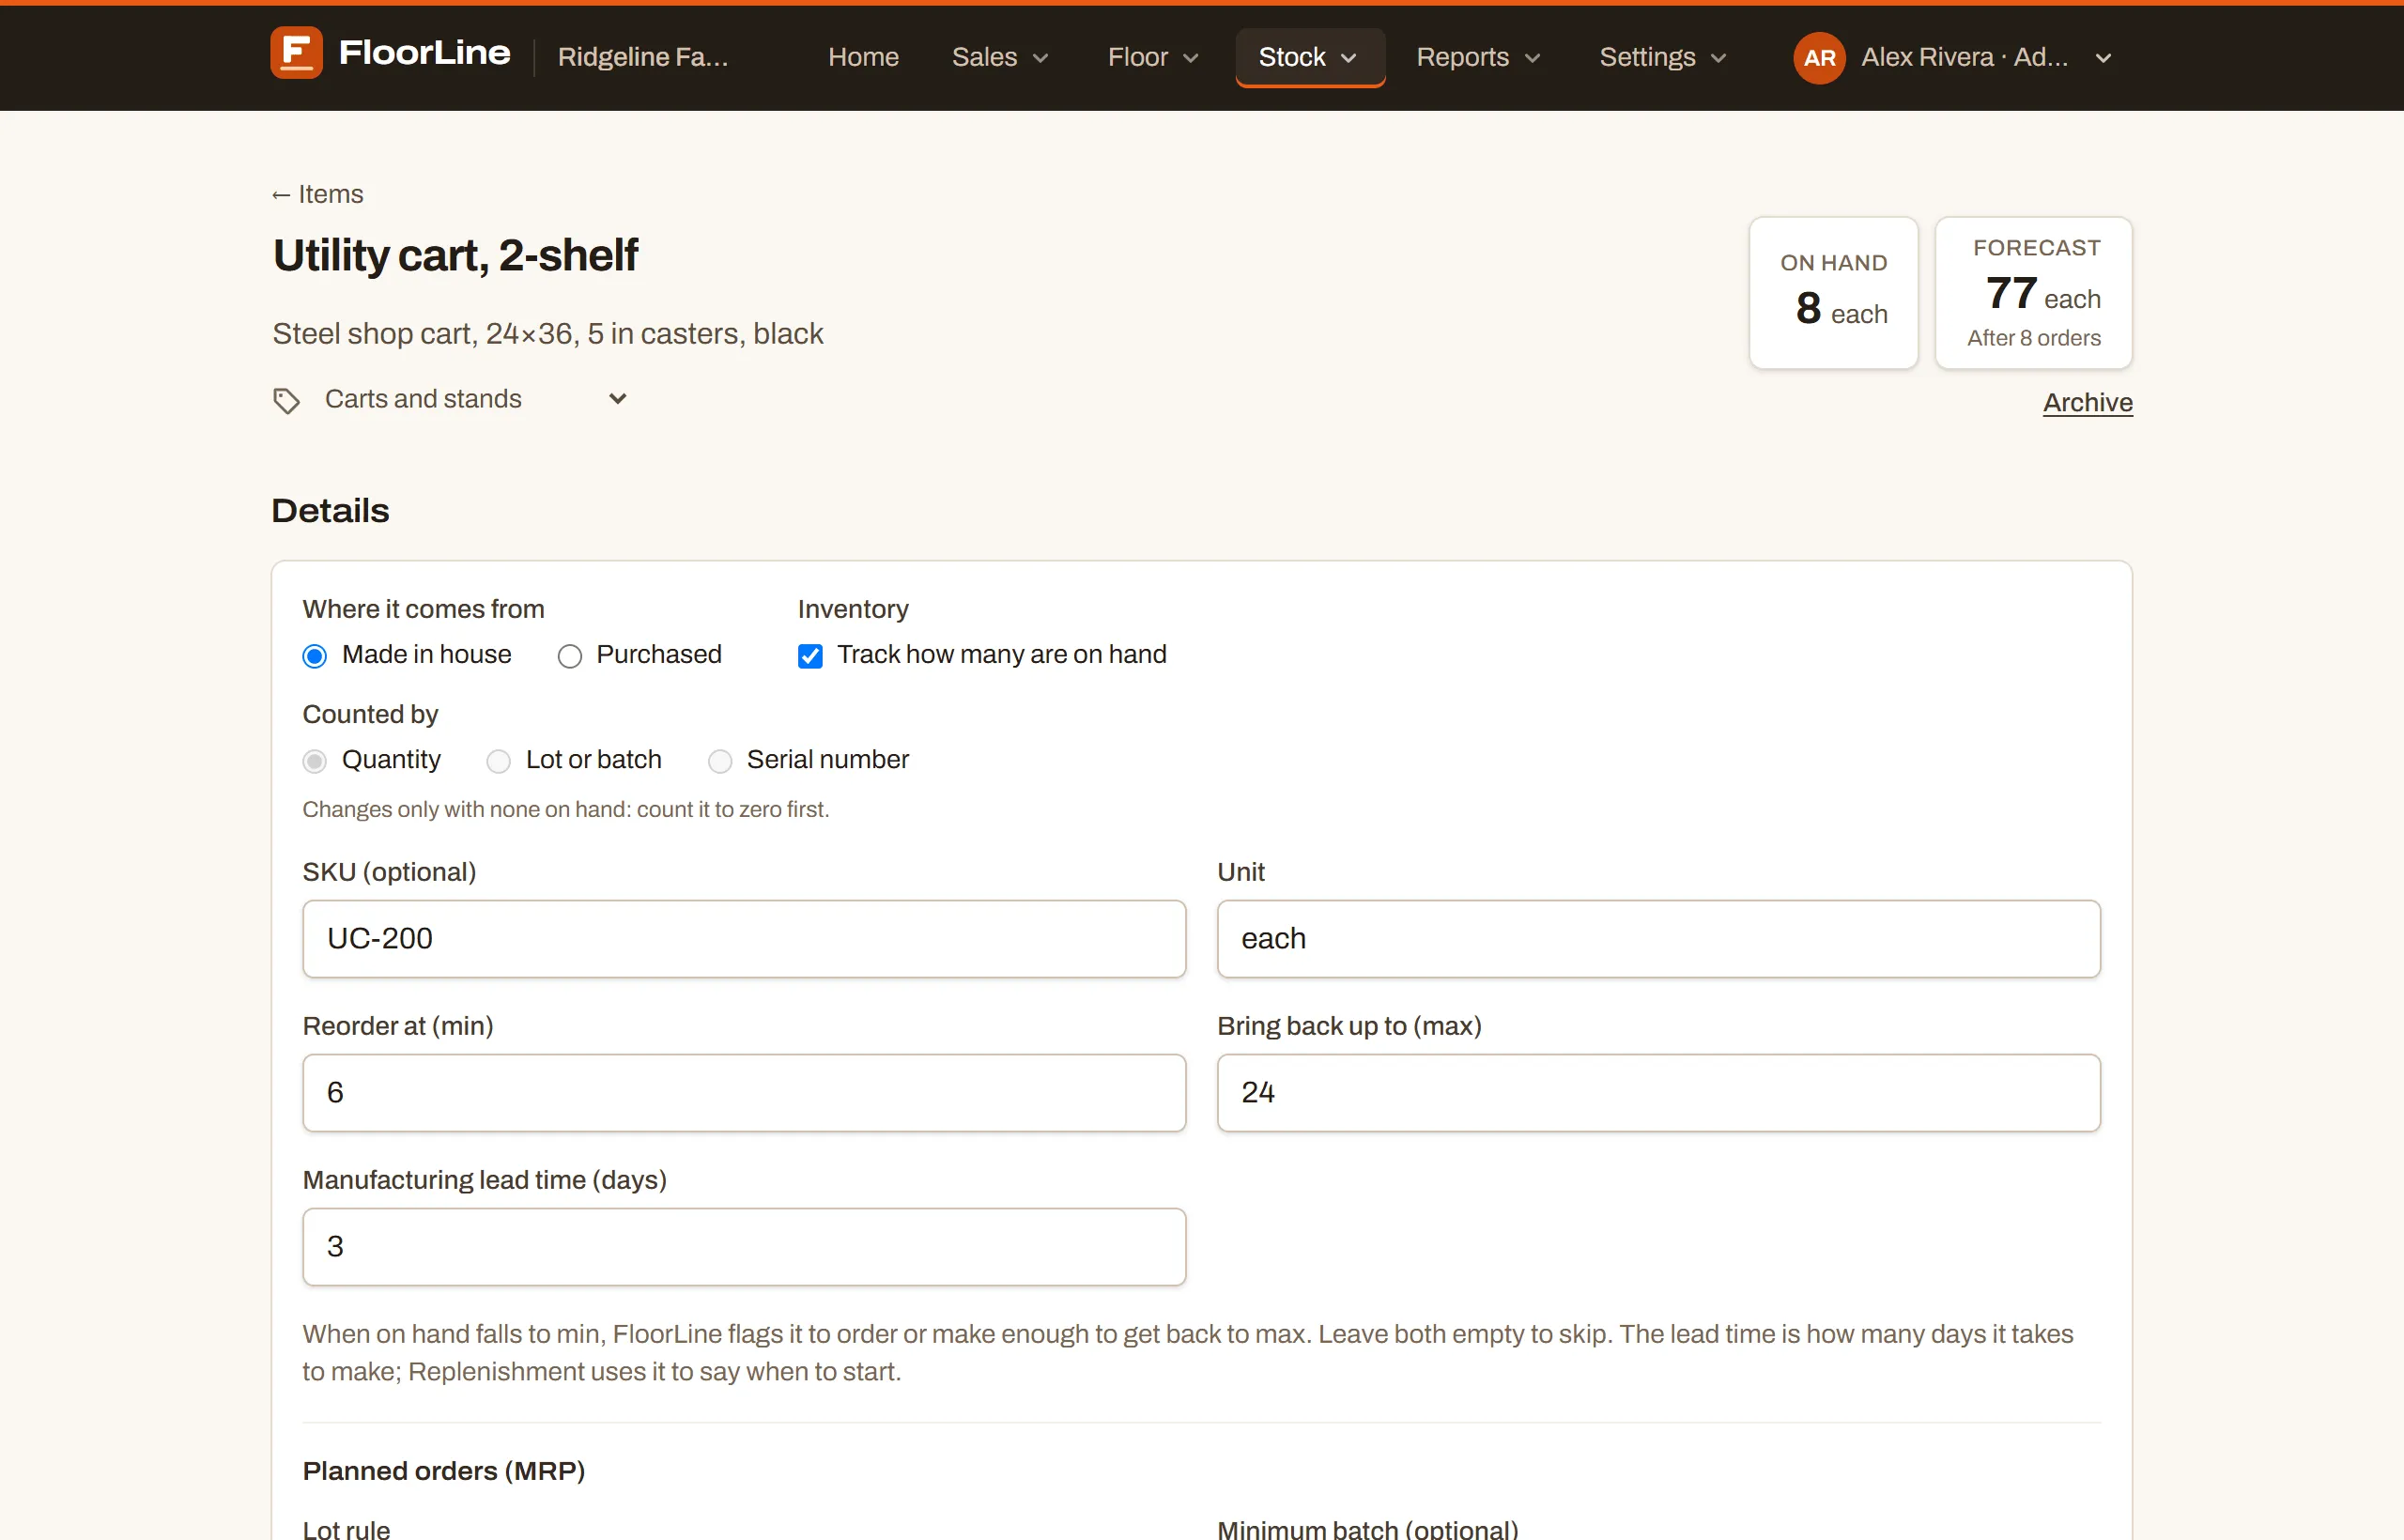
Section titled “Name, description, and category”- Name is the big title at the top. Click it to change it. Active items need different names.
- Description is the line under the name (“Add a description” when empty). Use it for a readable subtitle like “Steel shop cart, 24×36, 5 in casters”. It shows on the Items list and next to the item on bills of materials.
- Category is the menu with the tag icon. Choose a category, No category, or New category… to add one.
Inventory details
Section titled “Inventory details”The Details section holds what FloorLine needs to keep stock and reorder.
| Field | What it means |
|---|---|
| Where it comes from | Made in house (it has a routing and can have a bill of materials) or Purchased (bought from a vendor). |
| Track how many are on hand | On by default. Turn it off for things you don’t count, like shop rags. An untracked item has no stock, no min and max, and never shows as low. |
| SKU (optional) | Your part number. Active items need different SKUs. |
| Unit | How the item is counted: each, ft, in, m, lb, kg, gal, L, sheet, box, or any word you type. Stock, bills of materials, and work orders all use this unit. |
| Reorder at (min) | When on hand falls to this number, FloorLine flags the item to order or make. |
| Bring back up to (max) | How far a reorder should bring stock back up. Set both min and max, or neither. Max can’t be less than min. |
| Purchasing lead time (days) or Manufacturing lead time (days) | How many days an order takes to arrive, or how long the item takes to make, from 0 to 365. Replenishment uses it to say when to order or start. |
| Sale price ($) | What one usually sells for. New delivery and sales order lines start at it. |
| Unit cost ($) (Mid and up) | What one costs when it’s used as a material, for job costing. Leave it blank on a purchased item to use its preferred vendor’s price. |
Min and max only show while Track how many are on hand is on.
Made in house or purchased
Section titled “Made in house or purchased”A purchased item has no routing and no bill of materials. If you switch a made item to Purchased, the page warns that saving removes its routing and bill of materials, and they’re removed when you click Save. Switch back before saving to keep them.
Below Basic, every item is treated as made in house. If a shop moves down from Basic, the inventory details it saved are kept and hidden, and come back if it upgrades again.
Vendors for a purchased item
Section titled “Vendors for a purchased item”A purchased item has a Vendors table: where it’s bought, and on what terms. Vendors come from your list of vendors and customers; add a company there first if it isn’t listed.
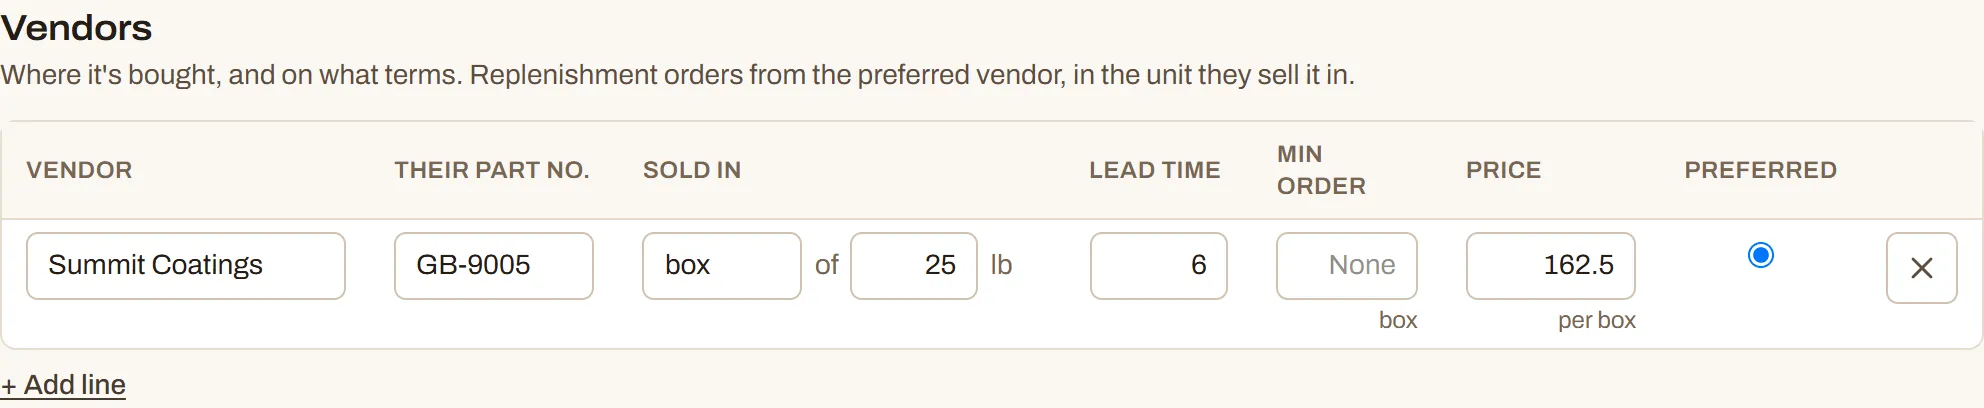
-
Open a purchased item and find the Vendors section.
-
Click Add new line (or Add line) and type the vendor’s name.
-
Fill in the terms you know. Every column except the vendor is optional.
-
Pick the Preferred vendor, then click Save.
| Column | What it means |
|---|---|
| Vendor | The company you buy it from. Each vendor can be listed once, up to 20 per item. |
| Their part no. | The vendor’s own part number. You can search the Items list by it. |
| Sold in | The unit the vendor sells it in, and how many of your units are in one. For screws counted each and sold by the box of 100, enter “box” of “100”. Leave it blank if they sell it in your unit. |
| Lead time | Days from ordering to arrival with this vendor. Blank uses the item’s own purchasing lead time. |
| Min order | The smallest order they take, in their unit. |
| Price | What one of their units costs. |
| Preferred | The vendor Replenishment orders from. The first vendor you add is preferred until you pick another. |
Stock is always kept in the item’s own unit. The preferred vendor’s terms decide how Replenishment suggests orders: when to order (its lead time), and how much (rounded up to whole packs and at least the minimum order), with the cost. Purchase orders show quantities in packs too (“= 3 box”).
On hand and stock changes
Section titled “On hand and stock changes”A tracked item shows On hand at the top right of its page. Click it to open the stock dialog, which has the amount on hand, the min and max, a form to record a change, and Recent changes.
-
Click the On hand box.
-
Under Record, choose A count (set on hand) after counting the shelf, or An adjustment (add or remove) to add or take away an amount. For an adjustment, a negative number removes.
-
Enter the amount and, if you like, a Note such as “Monthly count” or “Scrapped two bent ones”.
-
Click Save count or Save adjustment. It’s saved right away; you don’t need to click the page’s Save.
An adjustment can’t take on hand below zero: FloorLine says “That would take on hand below zero. Count it instead if it’s off.”
Recent changes lists each stock change with who made it and when: “Counted”, “Adjusted”, “Used by WO-1042”, “Made on WO-1042”, “Received on PO-1001”, “Shipped on DO-1001”, “Wasted on” and “Scrapped on” a work order, and so on. Each order number links to the order. Most stock changes happen on their own as work orders and shipments move; see How stock moves.
On the High plan with several locations, the dialog also lists on hand at each location and in transit, and an At menu chooses which location you’re counting. See Locations.
For an item counted by lot or serial number, the on-hand box opens a dialog for one lot or for serial numbers instead:
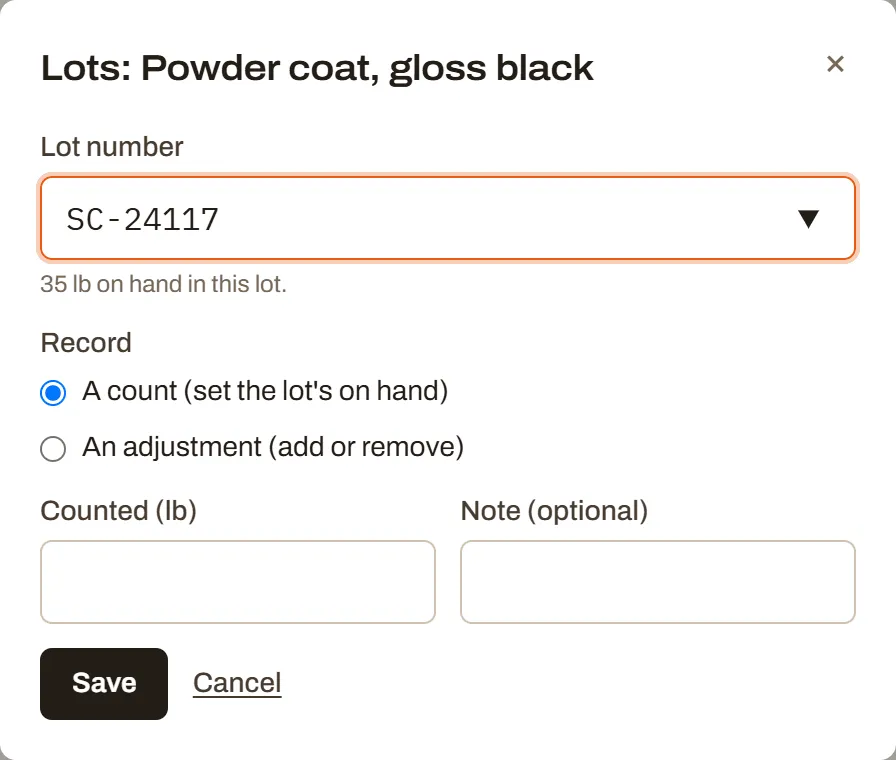
Counted by and expiry dates
Section titled “Counted by and expiry dates”Counted by says how a tracked item’s stock is kept:
- Quantity: just how many (the default).
- Lot or batch: stock is kept by lot number, like a powder’s batch or a steel mill’s heat number.
- Serial number: each unit has its own serial number.
Counted by can only change while none is on hand. If there’s stock, the page says “Changes only with none on hand: count it to zero first.”
Items counted by lot or serial number also get date settings:
| Field | What it means |
|---|---|
| Dates | Expiry date or Best-by date. |
| Shelf life (days, optional) | Dates each new lot or serial number from the day it comes in, unless someone enters a date. |
| Warn days ahead | How many days before its date a lot or serial number is listed under Expiring soon (30 by default). |
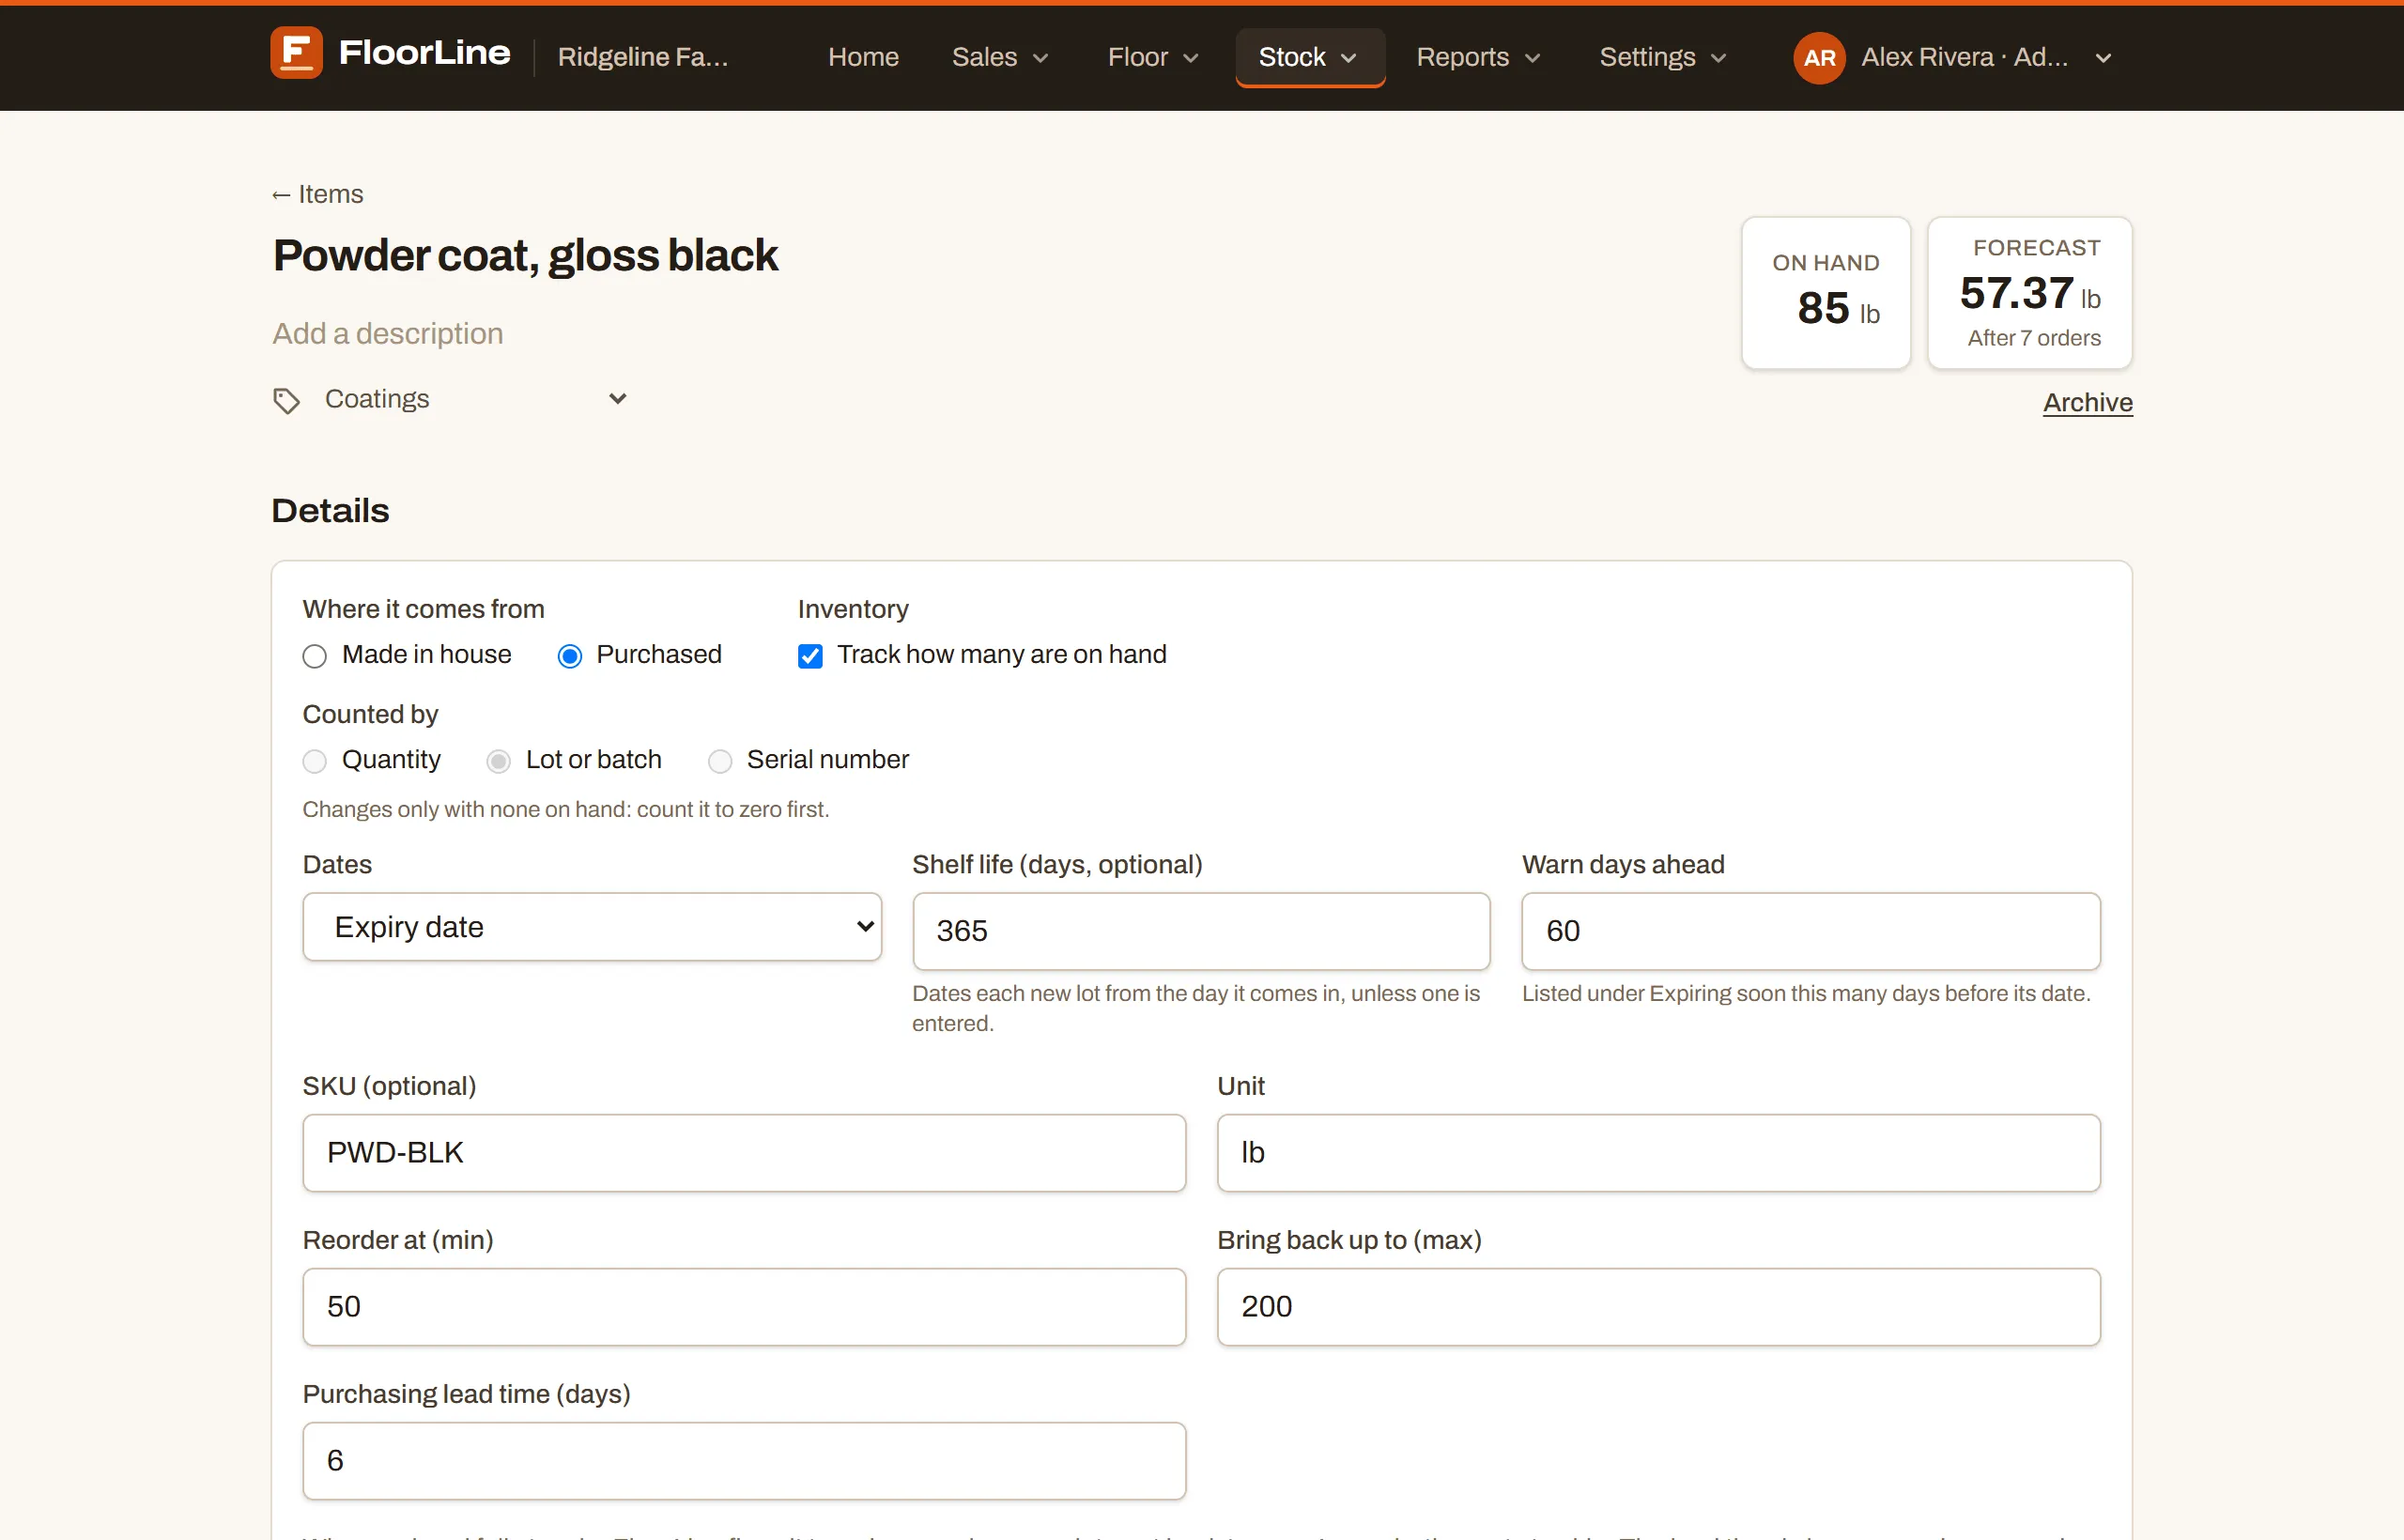
Lot and serial items also get a Lots or Serial numbers section on their page. How lots and serial numbers move, and the Expiring soon page, are covered in Lots and serial numbers.
Forecast
Section titled “Forecast”Next to On hand, the Forecast box shows where stock is headed once the open orders are done: on hand, less what active work orders and delivery orders still take, plus what work orders and purchase orders will bring in. Under the number it says “After 8 orders”, “No open orders”, or, in amber, “At or below min” (or “Below zero” for an item with no min).
Click it to see those orders in the order they’re expected to move stock, with what each takes or adds and the stock left after it, plus a suggested amount to order or make. Everything to replenish opens Replenishment.
Planned orders (MRP)
Section titled “Planned orders (MRP)”On Mid and up, tracked items have a Planned orders (MRP) block at the bottom of Details. It tells MRP how to size the orders it plans for this item.
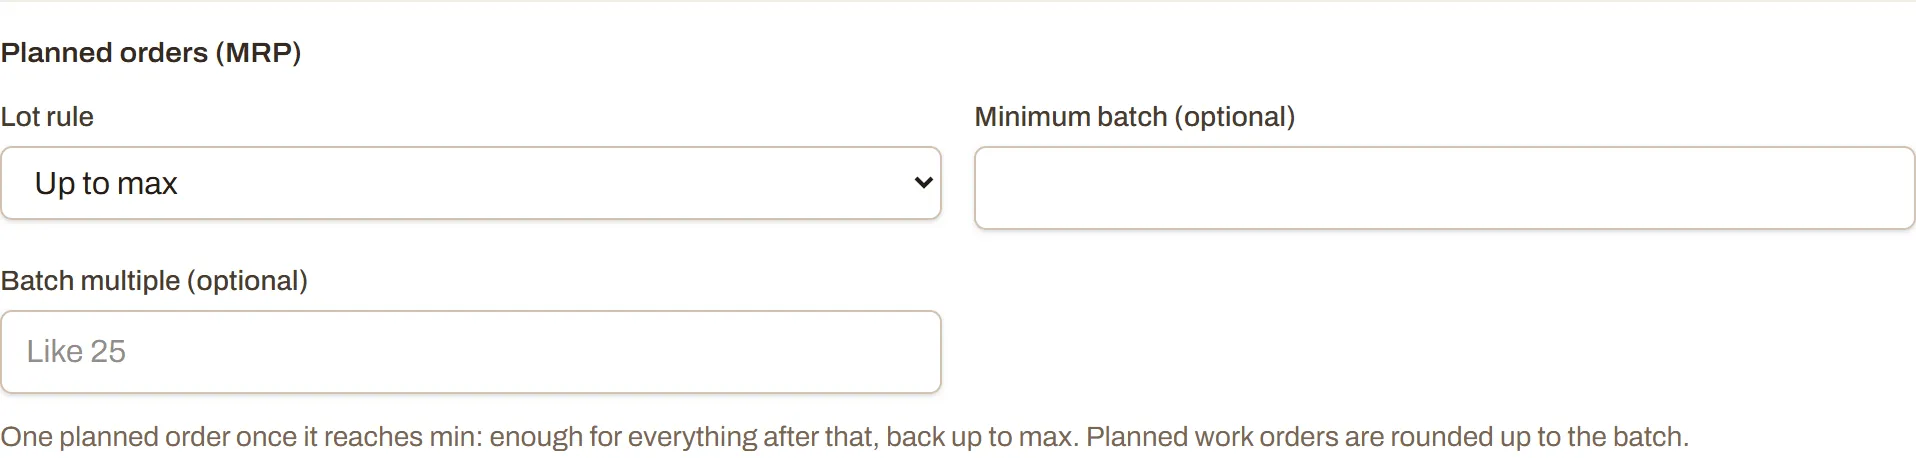
| Lot rule | What MRP plans |
|---|---|
| Up to max (the default) | One planned order once stock reaches min: enough for everything after that, back up to max. |
| Lot for lot | Exactly what each shortage takes, an order for each day stock would drop below min. Nothing extra on the shelf. |
| Fixed quantity | Whole lots of the same size (enter the Lot size), as many as each shortage takes. |
| Days of supply | Enough to cover the next so many days of demand in one order (enter the Days of supply). |
Made items also have Minimum batch (optional) and Batch multiple (optional): planned work orders are rounded up to the batch, for example to a multiple of 25. Purchased items are rounded up to the preferred vendor’s packs and minimum order instead.
Below the details, a tracked item’s page also has MRP, week by week: what takes the item, what’s coming in, and what MRP plans, a column a week. Pick a week to see the orders behind it. How MRP uses all of this is in Replenishment.
Used in
Section titled “Used in”A component’s page lists the items whose bills of materials use it under Used in, each linking to that item.
Archive an item
Section titled “Archive an item”Items are never deleted, so the work orders and stock history that point at them stay intact. Archive an item you no longer use instead.
-
Open the item and click Archive under the on-hand boxes.
-
Click Archive followed by the item’s name to confirm, or Keep to change your mind.
An archived item can’t be changed or put on new work orders. If it’s a component, it stays in its parents’ bills of materials, marked “Archived: remove it” until you take it off. Archived items are listed under Archived items on the Items list; open one and click Restore to bring it back.